Saturday, January 17, 2009

Mr. Mavis Makes Meatballs

From Mr. Mavis Makes Meatballs

I wanted to share one of my favorite non-pie related recipes that I have ever eaten. Once again, this post is incredibly late, my husband made these meatballs early in December while I was enjoying fantastic Christmas music, dancing goofily, and decorating for the holidays. In our home, the perfect night involves picking a soundtrack, opening a bottle of wine, prepping and cooking dinner together. This process always manages to completely erase the stresses of the day, and results in a fantastic meal. Sometimes though, nothing can make you feel more beloved than having someone make a meal from start to finish just for you. So, if possible, I recommend falling in love with someone who will buy you wonderful cookbooks, and then make you meals from those books.

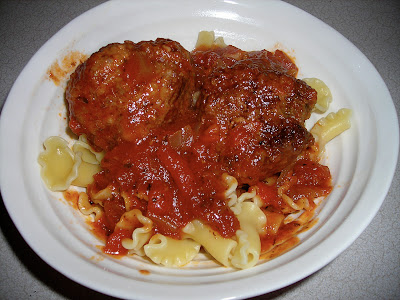
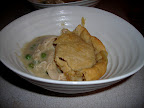
This is a fairly standard meatball recipe from a great cookbook, Not Your Mother's Slow Cooker Cookbook. The meatballs have fairly basic ingredients, and are browned in a skillet, but what makes this a recipe I crave is the 5 to 6 hour simmering time in a tomato-wine sauce in a crock pot. Our whole house smelled fantastic, I cranked the heat and listened to Sufjan Stevens and Los Straitjackets Christmas albums. Cold, miserable times like this just beg for slow simmered or braised recipes full of meat and carbs. These meatballs don't disappoint, especially if you manage to have a light enough touch shaping them, they are tender, delicious, and the wine and long cooking time add a nice depth of flavor to the sauce. Also, if your meatballs fall apart, you're left with a wonderful meat sauce, so it's a no lose situation. We always skip the spaghetti and go for shorter, chunky pasta like penne or campanelle (our personal favorite), which was the cookbook's suggestion, and saves me the embarrassment of spilling sauce all over myself.

Meatballs in Tomato-Wine Sauce (From Not Your Mother's Slow Cooker Cookbook)
Sauce:
2 T. olive oil
1 large yellow onion, finely chopped
3 cloves garlic, minced
3/4 c. dry red wine (note: we find the amounts of wine to be a bit strong, and usually only use a 1/4 to 1/2 c.)
28 oz. can diced tomatoes with their juice
6 oz. can tomato paste
1 t. salt
1/2 t. black pepper
1 T. fresh basil, minced
1 t. dried oregano
1/4 t. allspice
1 bay leaf
2 T. fresh parsley, minced

Meatballs:
1 1/2 lbs. lean ground beef
1 c. plain dry bread crumbs
2 large eggs
3 T. freshly grated Parmesan
1 t. salt
1/4 t. black pepper
3/4 t. fresh basil, minced
1/4 t. dried oregano
1/4 cup fresh parsley, minced
Dash of allspice
1 1/2 T. olive oil
1/4 c. red wine

To start the sauce, heat the olive oil in a large nonstick skillet over medium high heat, add onion and garlic and cook until softened but not browned, about 5 minutes. Add the wine, bring to a boil, boil for 1 to 2 minutes, then transfer to the slow cooker. Add the tomatoes, tomato paste, salt, pepper, bail, oregano, parsley, allspice, and bay leave to slow cooker, stir to combine, cover and cook on high while you prepare the meatballs. For the meatballs, put the ground beef in a large bowl and break it up a bit, add the bread crumbs, eggs, Parmesan, salt, pepper, basil, oregano, parsley, and allspice. Gently blend with your fingers, and shape into 12 meatballs, each a bit bigger than a golf ball. Heat olive oil in the skillet over medium high heat, brown meatballs on all slides, and then transfer to the sauce. Pour the fat off of the skillet, return to the stove, and add the wine, cover over high heat for 2 to 3 minutes, scraping up any brown bits, and pour over the meatballs. Reduce the slow cooker to low, and cook covered for 5 to 6 hours. Remove bay leaf and serve over pasta.

Saturday, January 10, 2009

Mavis Makes A Chocolate Banana Cream Pie

So I don't know how your holidays were, but I know mine passed so quickly, I can't really remember where I spent all of my time, which is no excuse for a two month hiatus in posting. I baked the following pie for my husband's birthday, which was the week before Thanksgiving, if that tells you anything about my prolific laziness. On the upside, I have two more sets of photos saved in my camera, and I am desperate to make more pie. My intent is to post more often, as a mere justification to make more pie.


The Dough:

I tried yet another pie dough, this time, a pat in the pan dough. This should really be the go-to dough for anyone who is pastry phobic. I saw it demonstrated on Cook's Country (I know, you would think I got paid for this kind of adoration, but I really just like their recipes) and could not wait to try it. When I saw the America's Test Kitchen Family Baking Cookbook at Costco for an attractively low price, I brought it home with me and promptly tried this recipe. It was exceptionally easy to mix, and had the consistency of play dough when I shaped it into the pie plate. The only warning I would give everyone is to make sure you get the dough fully up the sides of the pan, for some reason, I stopped somewhat short, and you can see that in the photos. The taste was great, the texture was more crumbly than flaky, but it really holds up to the filling, and had a nice, slightly salty contrast to the chocolate cream.


The Filling:

One of my husband's favorite pies is banana cream (possibly second to pumpkin), and thus, it was his request on his birthday. I have to admit I'm not the biggest cream pie fan, but I love me some French Silk every now and then. When I proposed mixing the classic banana filling with a chocolate base, my husband was game. I am only half-heartedly transcribing the filling recipe below, because the result was only so-so. I thought the chocolate filling was a little too pudding-like and sickly sweet, unlike the silky, rich, and subtly sweet chocolate of my dreams. If I were to try this again, I would look for a darker chocolate and use less sugar. That being said, the bananas paired with the chocolate offered a cool refreshing reprieve in every bite.


The Final Verdict:

This dough will become a staple in my kitchen, especially for bringing pies to events, because it truly is no fail. My husband adored the pie, and we finished every slice, but while perusing the Internet, I saw a recipe for banana cream pie that involved sauteing them in liquor, almost like a Bananas Foster pie, which I think I would prefer to try instead of tinkering with this recipe. If I do, you know it will end up on Umble Pie.


Easiest Ever Press-In Single-Crust Pie Dough
(From The America's Test Kitchen Family Baking Book)
1 1/4 c. all purpose flour
2 T. sugar
1/8 t. salt
8 T. unsalted butter (softened)
2 oz. cream cheese (softened)

Grease a 9 inch pie plate. Whisk the flour, sugar, and salt together in a medium bowl. In a large bowl, beat the butter and cream cheese together with an electric mixer on medium-high speed until completely combined, about 2 minutes. Reduce the mixer speed to medium-low and beat in the flour mixture until it resembles course crumbs, then increase speed and beat until dough forms large clumps. Transfer 3 T. of dough to a small bowl and turn remaining dough clumps onto a lightly floured counter, gather into a ball, flatten into 6 inch disk and transfer to the pie plate. Press the dough evenly over the bottom and work up the sides of the pie plate. (Note, if you are using a glass pie plate, it's handy to hold the plate up to the light to see if the dough is unevenly distributed and even the dough out.) Roll each of the reserved tablespoons of dough into an 8 inch rope, arrange on the edge of the pie plate leaving about an inch gap between each rope, squeeze the ropes into the crust to make the edge, and shape as desired. (This was the most fun I've had with pie dough ever, just like making snakes out of play dough.) Cover loosely with plastic wrap and freeze for about 30 minutes until dough is fully chilled and firm. Heat oven to 375 degrees, cover dough with foil and fill with pie weights, bake for 25 to 30 minutes, then remove weights and foil and cook until crust is golden brown, about 10 to 12 minutes. Let crust cool to room temperature before filling.

Chocolate Banana Cream Filling
(Adapted from three recipes in The Joy of Cooking)

3/4 c. sugar
1/4 c. cornstarch
1/4 t. salt
2 1/2 c. whole milk
5 large egg yolks
2 T. unsalted butter, cut into small pieces
1 1/2 t. vanilla
2 oz. unsweetened chocolate, chopped
2 ripe, firm bananas, peeled and thinly sliced.

Whisk sugar, cornstarch and salt in a medium saucepan until blended, whisk in milk and bring to a simmer, melt chocolate in hot milk mixture, then add the egg yolks. Stir constantly over medium heat, bring to a simmer. Remove from heat, and whisk until smooth. Return to heat, bring to a simmer and cook for one minute. Off of the heat, whisk in the butter and vanilla. (Note, much of the recipe for the cream pie confused me, mostly, I tinkered with stirring on and off heat, and then not stirring on and off heat, until the whole mixture was smooth, thickened, and combined, the filling was actually ok, just underwhelming for my taste, but I'm sure my technique left much to be desired.) Spoon one third of the slightly cooled cream mixture into the baked, cooled crust, layer over one half of the bananas, add the second third of the cream mixture, then the rest of the bananas, and finally, the rest of the cream. Chill the pie until the filling sets, about three hours. (My pie crust was almost overflowing, but after chilling, it was solid and held its shape.)

Sunday, November 23, 2008

Ethel Makes Caramels


This is not a pie. But it is yummy.

I used the recipe from The Kitchn. However I have never seen ginger extract so I infused some ginger pieces in the cream and used some dried ginger with the cinnamon. I also made a batch with just vanilla. I couldn’t taste any ginger in that batch so I am still looking for extract or something equally brilliant to come my way. As long as you watch your color and temperature, I think these are going to be a go to candy for me.

My sister’s husband had to hide them so I think others acknowledged the win.

Monday, November 17, 2008

Mavis Makes A Chicken Pot Pie

From Mavis Makes A Chicken Pot Pie

Stop what you're doing right now, write down the ingredients for this recipe, and go home and make yourself a pot pie. You will not regret it, unless you're the type to regret eating two helpings of chicken smothered in cream sauce and baked under a layer of delicious, buttery pie dough, in which case, I do not believe you are my demographic.

This recipe is from Cover and Bake, one of my two favorite cookbooks, and this one is edited by Cook's Illustrated. Not one recipe from this cookbook has disappointed me, even when I have failed to fully read the directions. It also contains the Test Kitchen's famous take on green bean casserole, which is good enough to make me want to fry my own onion rings. I don't really have a point now, just, I guess, you should own this cookbook, and die a happy, artery-clogged girl.

The Dough:
From Mavis Makes A Chicken Pot Pie

I truly failed in taking pictures for this dough making endeavor, I should have created some sort of make shift camera tripod and set the timer, because my technique was ineffectual, but kind of hilarious. I used the savory pie dough recipe in the book, but failed to use a food processor as is recommended. The cookbook did offer an alternative of freezing the butter and using a cheese grater. I did not discover the issue with this hint until I had started to prepare the dough. First of all, the hint only mentions the butter, not the shortening, so I'm not sure what the intention is there. I attempted to freeze the shortening, but did not allot enough time for it to get hard, so I just used a pastry blender. Second, I must be grater impaired, because I always have a quite substantial nub of whatever I'm grating left to protect my fingers from injuries. So I had to cut up quite a bit of the butter anyway. Third, the hint doesn't really say what should be done after grating the butter. In the end, I used my hands to incorporate the butter and water. This worked out quite well, but only because I only needed about half of the dough, so my mishaps in rolling out the dough were more than covered by the massive amounts of extra dough.

The Filling:
From Mavis Makes A Chicken Pot Pie

This recipe allowed me the opportunity to both poach chicken breasts and shred the meat for the first time. Poaching raw chicken in broth looks kind of gross (see delightful pictures of the pink and yellow color combination, followed by pasty white chicken floating amidst little globules of fat) but produces flavorful results. It also makes your home smell fantastic and unbelievably comforting. The very traditional vegetable choices, and thick sauce made with broth, flour, and milk are just fantastic. Despite all of the steps in this recipe, and my missteps with the dough, we had the whole recipe in the oven in under one and a half hours, with better time management, this just may be a near staple in our home. We chose to cook half of the filling in an 8 by 8 inch pan and save the other half for later. You can also bake individual pot pies in oven proof bowls.
From Mavis Makes A Chicken Pot Pie


The Final Verdict:
From Mavis Makes A Chicken Pot Pie

I am in love with cooking again, in no small part to recipes like this. I find Cook's Illustrated often makes me feel like I'm stretching a bit, and trying something new, but inevitably, their attention to detail helps me through. The final meal was unbelievable, the thyme and wine lent a very subtle sweetness and depth of flavor to the final product. The pie dough, despite my troubles, did not disappoint, it was flaky and tender, and seemed to melt in my mouth. My husband's verdict: "a big chicken and veggie blanket in your stomach" which does not sound complimentary, but I think he is trying to say that this is the ultimate comfort food.


Savory Pie Dough Topping (from Cover and Bake)
makes enough for 1 Pot-Pie Recipe
1 1/2 cups all purpose flour
1/2 t. salt
4 T. vegetable shortening (chilled)
8 T. unsalted butter (chilled and cut into 1/4 inch cubes)
3-5 T. ice water

Process the flour and salt in a food processor fit with the steel blade until combined. Add shortening and process until the mixture has the texture of coarse sand. Scatter the butter cubes over the flour mixture; process until the mixture is pale yellow and the resembles coarse crumbs, transfer mixture to a medium bowl. Sprinkle 3 T. water over mixture, fold with a rubber spatula to mix, press down with spatula until dough sticks together. Press the dough into a rectangle and chill for 30 minutes. When the filling is ready, roll dough on a floured surface into a 15 by 11 inch rectangle 1/8 inch thick. Place dough over filling and trim, you can either fold the edges down into the casserole dish, or fold back onto itself and crimp into a pie crust edge.


Chicken Pot Pie (from Cover and Bake)
Serves 6-8
1 1/2 lbs boneless, skinless chicken breasts and/or thighs
2 cups low sodium chicken broth
1 1/2 T. vegetable oil
1 medium-large onion
3 medium carrots, peeled and cut crosswise 1/4 inch thick
2 small celery ribs, cut crosswise 1/4 inch thick
4 T. unsalted butter
1/2 cup all purpose flour
1 1/2 cups whole milk
1/2 t. dried thyme
3 t. dry sherry (we used white wine)
1 cup frozen green peas
3 T. minced fresh parsley

Adjust oven rack to lower middle position and preheat oven to 400 degrees. Simmer chicken and broth over medium heat in a covered dutch oven until chicken is just done, about 8-10 minutes. Transfer chicken to a large bowl and reserve the broth. Increase the heat to medium high heat, and heat oil in the dutch oven. Add the onion, carrots, and celery; saute until just tender, about 5 minutes. Season to taste with salt and pepper. Shred the chicken into bite sized pieces. Transfer the cooked vegetables to the bowl with the chicken. Melt the butter over medium heat in the same dutch oven; add the flour and cook until golden, about 1 minute. Whisk in the reserved chicken broth, milk, any accumulated chicken juices, and thyme. Bring to a simmer and simmer until the sauce fully thickens, about 1 minutes. Season with salt, pepper, and stir in the sherry. Pour the sauce over the chicken mixture, stir in parsley and peas. Pour mixture into a 9 by 13 inch pan, top with pie-dough, and bake until topping is golden and filling is bubbly, about 30 minutes.

Mavis Makes An Apple Tart

So, um, I'm embarrassingly bad at actually posting to this blog. I made this tart in *cough* October *cough* and I'm just now writing about it today, which is also the reason for me posting twice in one day. But be gentle with me, I had my first blog related injury with this tart, I managed to drop the tart ring on my wrist directly after removing it from the oven (sadly, the pictures of said injury did not turn out.)

I picked this recipe from one of my favorite blogs, Smitten Kitchen, which is such a lovely site, because it includes such specific notes about her experiences with the recipes. The best thing about this tart is how easy it is, and really, the elegance of its appearance. It was great fun to make. However, if asked about the result, I would say it's good. Not great, not something I would crave, but solidly good. So let's break out this tart.

The Dough
:
From Mavis Makes An Apple Tart

Part of the reason I wanted to do a blog on pie is to master pastry dough, so I am determined to try many different recipes and techniques until I am satisfied that I have a dough I can reliably make every time with consistent results. I am also unreasonably annoyed at the prevalence of the use of the food processor for every pie dough recipe, so I want to try out every possible alternative before moving to the food processor. Ironically, I am not opposed to the stand mixer, which was my tool of choice for this recipe. This recipe also had basic ingredients, but used the stand mixer to incorporate the butter into the dry ingredients. After that, I think I was supposed to use my hands to add in the water, but instead, I just lazily turned the stand mixer on again. The dough combined almost immediately after I dribbled in the water into the most lovely and workable ball of dough. I believe I did not chill the dough long enough to prevent the dough from sticking slightly to my counter, but I experienced no adverse effects overall. I chose to overlap the dough, gallette style, which was rustically pleasing, but unnecessary (I always want more crust when eating pies though, so this worked out well.)

The Filling:
From Mavis Makes An Apple Tart


The filling is just apples, peeled, cored, sliced, and arranged in the dough. The tart is brushed with butter and sprinkled with sugar before baking. The peels and cores are reserved to boil done with water and sugar to make a syrup that's brushed on the finished tart.

The Final Verdict
:
From Mavis Makes An Apple Tart

This is a dessert you can throw together on a weeknight, really, especially if you are any faster at peeling apples than I am, and I assure you, you are. The finished product was beautiful, but underwhelming in taste. The tart dough was tasty, and flaky. I think if you have local and freshly harvested apples, the tart would be fantastic, but with middling super market apples, the tart was just good. My husband's final verdict "tartuffeian" but you would need to ask him what exactly that means.

Alice Water's Apple Tart via Smitten Kitchen

Dough
1 cup all-purpose flour
1/2 t. sugar
1/8 t. salt
6 T. unsalted butter, softened, cut in 1/2-inch pieces
3 1/2 T. chilled water

Mix flour, sugar, and salt in the bowl of a mixer, add 2 T. butter, blend until dough resembles coarse cornmeal. Add rest of the butter, mix until biggest pieces look like peas. Slowly dribble in water while mixer is running until dough comes together. Flatten into a disk and refrigerate for at least 30 minutes. Remove, let soften so it's malleable. On a lightly floured surface, roll into a 14 inch circle about 1/8 inch thick. Place in a lightly greased 9-inch round tart pan. Heat oven to 400 degrees F.

Filling
2 lbs apples (Golden Delicious or another tart, firm variety), peeled, cored (save peels and cores), and sliced
2 T. unsalted butter, melted
5 T. sugar
1/2 cup sugar

Overlap apples on dough in a ring 2, continue inward until you reach the center. Fold any dough hanging over pan back over the apples. Brush melted butter over the apples and dough, sprinkle the 5 T. of sugar over the apples and dough. Bake in the oven until the apples are soft with browned edges and the crust is dark golden brown, for about 45 minutes, turning the tart pan every 15 minutes. Meanwhile, place the reserved peels and cores in a saucepan, cover with water and add the 1/2 cup sugar. Simmer for 25 minutes and strain. Remove the tart from the oven, cool for 15 minutes on a rack, brush with glaze and serve.

Saturday, November 15, 2008

Ethel and the Pumpkin Pie


My hubby has already requested this pie again so before I go into everything that went wrong I’m going to state that this is a success.


As I didn’t have the back up power of the mother I decided to stick to her crust, as I now know how it should look and feel.  I was very careful to make sure everything was cold and it rolled out beautifully.  I pinched the edges and it looked amateurish but not horrific.  I placed aluminum foil over it and put it into the oven to par-bake.  I checked on it and it looked like something that was deep fried at too low of a temperature.  A big soggy napkin at the bottom of the pan. 

I would have given up except that the filling was all put together.  I just started over.  This time I kind of crimped it over the edge of the pan hoping it would hold it up and I omitted the aluminum foil thinking that in my cruddy oven I didn’t want to open the door and let out any heat to remove it.  The second crust was a little puffy and not as pretty, but it was useable.

The filling I got from two Fanny Farmer recipes that I fused.  I wanted to use the cream from another recipe because I bought a half-gallon of cream earlier in the week to make some caramels (so yummy but that is another story).  I wanted to use the ginger and bourbon from another. 


Pumpkin Pie adapted from The Fannie Farmer Baking Book.  Alfred A. Knopf, Inc., New York. 1984

2 cups pumpkin (I used a beautiful pie pumpkin that I got in the final CSA pickup)

3 eggs

1 ½ cups cream

1 cup sugar

½ tsp. salt

2 TBL. bourbon

1 tsp. cinnamon

1 tsp. ground ginger

¼ tsp. nutmeg

¼ tsp. cloves


This made a lot.  I baked the extra as custard.


Mom’s Pie Crust for a single pie

1 cup flour

½ tsp. salt

1/3 plus 1 TBL. Shortening

less than ¼ cup cold water


The Verdict

It was yummy.  The crust was so-so.  The custard was a little stringy from the fresh pumpkin but it tasted like squash.  It was sweet but not heavy on the tongue.  I think the combo of flavors was uber tasty. 

Thursday, October 30, 2008

Ethel (and her Mom) Make an Apple Pie


Hello! I’m Ethel and am Mavis’ partner in piedom.

I have been in the kitchen most of my life.  I was often perched in the doorway keeping my mom company as she made dinner.  My mother is very animate and was always giving lessons.  She would have me feel bread doughs (like a baby’s bottom) (an analogy that still bothers me) and would show me the consistency of shortening and flour that has been appropriately cut together.  I can make a decent loaf of bread and I think my cakes are as good as my mom’s.


Pie is scary though.  Even the best cooks have fillings that won’t set or cheese cakes that crack.  I have seen hundreds of crusts that resemble cardboard.  I don’t like to do anything poorly so I have avoided the genre of pie making completely.


This Pie Experience


It started with buying apples at 12:30 in the morning.  My parents were coming up the next day so I thought it was a good time to try my first real pie.  I briefly remembered the America’s Test Kitchen suggestion to use two types of apples but couldn’t remember what they required.  And with it being so late and I was half asleep and meandering the grocery store, I didn't care.  I used half Granny Smith and half Macintosh expecting the grannies to give structure and the Macintosh the strong sweet apple flavor.

The next day I started on the dough about two hours later then I expected.  When my parents arrived at our new apartment I only had the dough made.  It was far drier then I anticipated and so I put it in the fridge to hydrate (as all the cooking shows suggest) while I cut the apples.  My dad was hungry so we decided to let everything sit and went to feed him. 

Upon returning my mother decided that it would be easier to start over then to use my dough.  I had to hang my head in shame.  My mom did confess that she started with the Fannie Farmer recipe 30 years ago and found the dough too dry as well.  My mom leans more towards the tender then flaky and her best suggestion for hydrating dough is to add more fat.  She is a pie rolling queen, though. 

 The Fannie Farmer Baking Book.  Alfred A. Knopf, Inc., New York.  1984

For 9 inch 2-crust pie

2 ¼ cups flour

½ tsp. salt

¾ cup vegetable shortening

6-7 Tbl. Cold water  (I used 8 or 9)


6-7 apples

¾ cup sugar

½ tsp cinnamon

¼ tsp nutmeg

lemon juice and lemon zest


Mom’s Pie Dough (probably adapted from Betty Crocker but the origins have been lost through time)

2 cups flour

1 tsp salt

2/3 cup plus 2 Tbl shortening

up to ½ cup cold water (start with less)

My mother states that as she over measures everything so it is probably closer to 1 cup of shortening.  My mom always uses butter flavored Crisco.

The Results

This was one of my early experiences with this oven.  I hate it.  It has solid metal burners that give no control.  The oven has no window or light so you can’t see what is going on unless you open the door.  It drops in temperature much easier then any other oven I have owned.  The crust really didn’t darken and it cooked at least 30 minutes longer then it should have.  The crust was brittle and dry and the apples had steamed themselves into mush. 


It was the best applesauce I had ever eaten.  

I have never calibrated an oven but I think it will be required before my next experience.